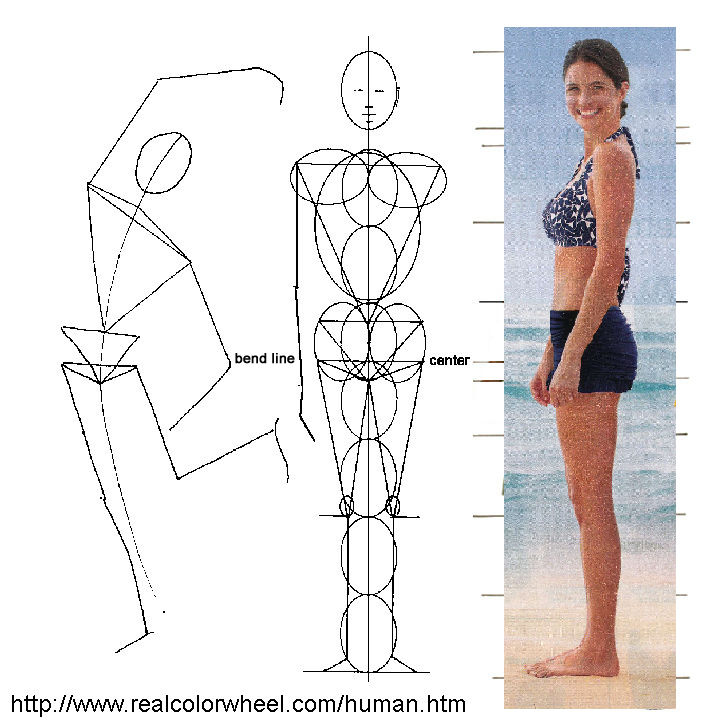
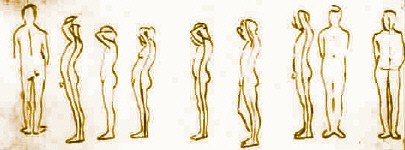
HUMAN PROPORTIONSThank you for coming to this page.The Real Color Wheel is, I think, my most important page. Real Color Wheel Explained Human Figure Drawing ProportionsHere are the human proportion marking points on a normal-twenty-year-old. The skull is the basic division of the human body which is eight heads high. The parting between the legs is one quarter head below the middle of the body.
HEAD START WITH A (3 x 4) OVAL. Divide this head like this:
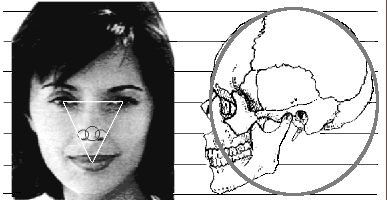
 The head sideways is one head-length high and one head-length wide. The top of the ear is on line with the top of the eyes. The ear hole is in line with bottom of the nose, and the backbone/skull pivot point. The bottom of the ear varies with the individual and age.
FRONT-VIEW The face triangle is from the center of each pupil, through the nostrils of the nose to a point between the top front teeth. To me, this is an important trait, everybody's triangle is a little different.
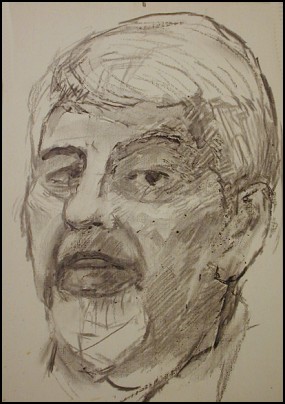
This charcoal self-portrait drawing is on a white background. It was then painted with only two neutral dark-making colors, Red Oxide and Ultramarine Blue. A Burnt Sienna glaze was then used for warmth where it is needed. The classic pigments are vermilion, vine black and Naples yellow.
Five eye-widths span the center of the skull, again, everybody is a little different. The space between the pupils is an average of two-and-a-half inches. The width of one eye is usually equal to the space between the eyes. PROPORTIONS OF THE BODY
The neck space is 1/4 of one head length, under the chin of the top first head.
The shoulder line is two head lengths (two widths on a female) wide and is the top line of the torso triangle that extends down to the top of the hip triangle.
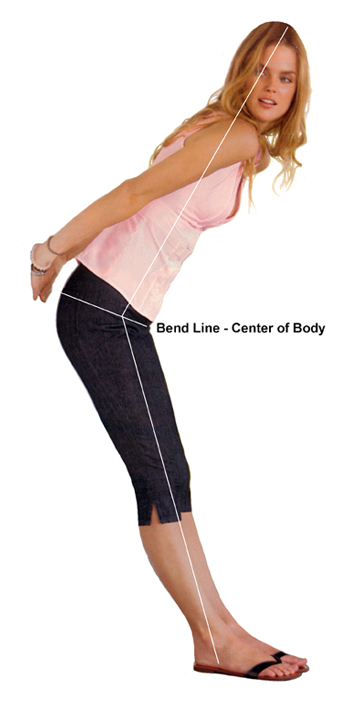
The center of the body is the bend line, which forms the top line of this small, third, bend line triangle. Its top line is 1/4 head above the space between the legs and two head widths wide. Not more.
The rib cage can be represented by an oval two heads high, starting at the top of the (lowered) second head to the bottom of the third head.
From the outside point of the bend line triangle down to the bottom of the knee cap is two head lengths.
THE-DRAWING-ORDER OF A STICK FIGURE, IN ACTION 1. Start with the center balance line from top to bottom.
That's it. These simple steps include the lines that can catch any action, fast! Now, to finish the form, put the trunk triangle in, the shoulder balls, knee caps and rib cage. From the bottom of the bend-line triangle which is the space between the legs, connect a line to the bottom of the knee cap for the inside of the leg. Connect another line from the outsides of the top of the bend line triangle to the bottom of the knee caps. The bottom of the knee cap is two heads up from the bottom. Add the calf lines, and the stick figure is finished. It's accurate, balanced, and ready for the muscles.
This drawing is a male, the width of the shoulders is two heads high, a female's shoulders are narrower at two heads wide. 
This 7 year olds head is 1/4 of one head larger than the 7 heads used to make the rest of her body. The rest of the body has the same divisions as an adult body. A 17 year old would have 8 full sized heads making up the divisions their body. It's an age to head size ratio. 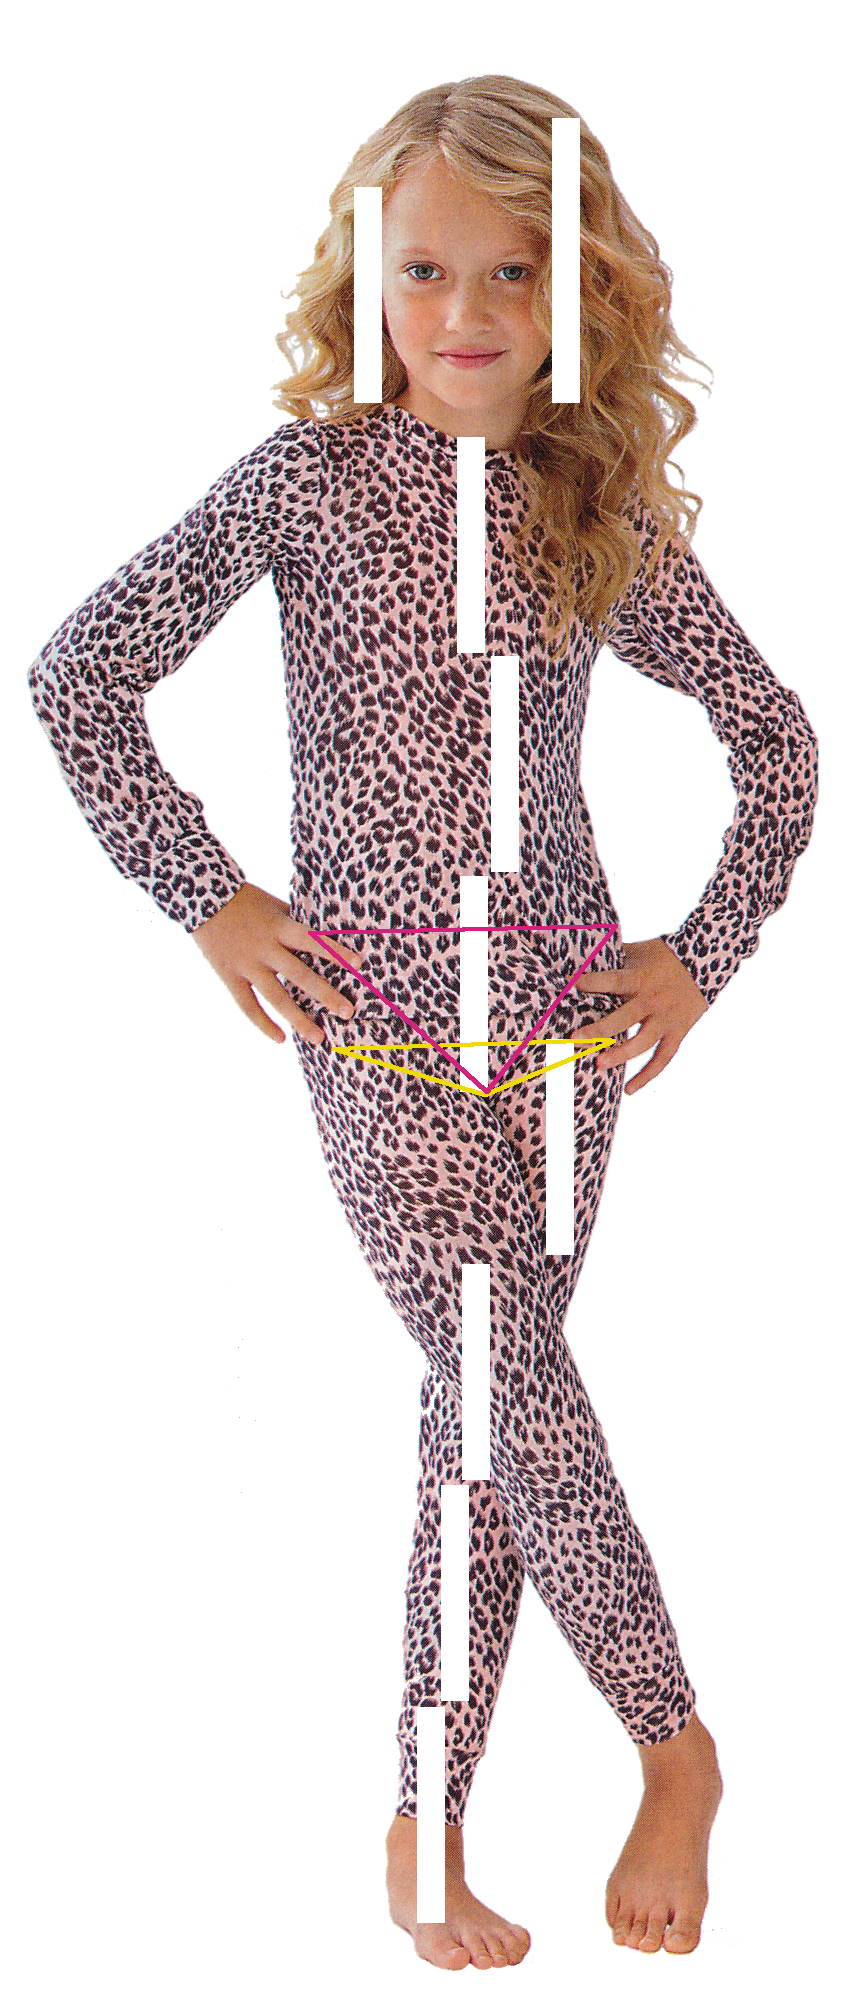
The center of the human form should be at the bend-line, 1/4 head above the space between the legs. Check it out on yourself, Michelangelo was right, de Vinci was wrong. 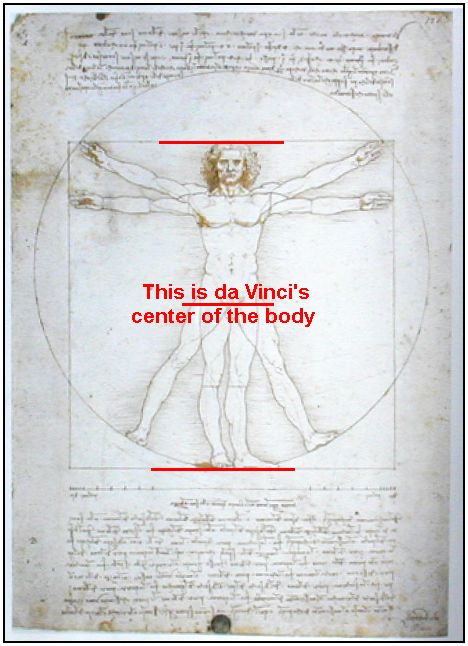
Michelangelo's David matches my chart recommendations. 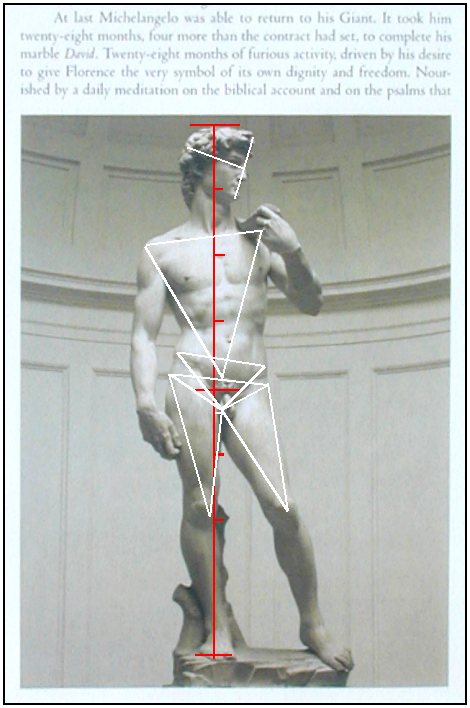

This is a "crop circle", they happen all around the world but mostly in England, this one, the largest ever, 530 Meters x 450 Meters on 8-7-9, happened in Holland, near Goes, Zeeland. No one knows for sure who makes them but it seems like a more intelligent life source wants to communicate with us. Each one is different, unique and complicated. They sent back an answer to what we sent out as radio waves, in a crop circle. See a 360º fly-around of the human angel. http://www.youtube.com/watch?v=nMxbBcK9r7Q
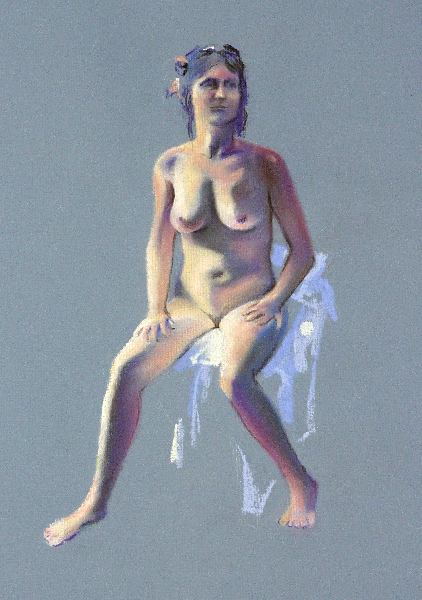
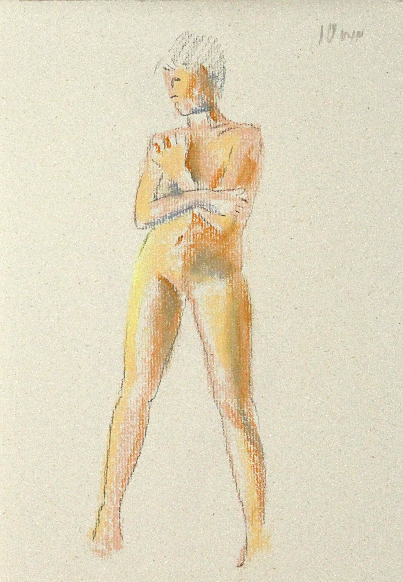
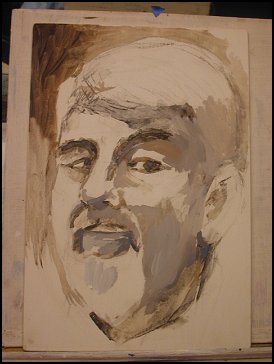
I bought a new hemp paper drawing pad and it holds the texture much stronger than the colored paper so it took longer to fill it. I didn't get the picture finished but it does show an intermittent stage close to finished.

"ELIZABETH'S ADVICE ON THE PAINTING OF PORTRAITS"
You should always be ready half an hour before the model arrives. This helps to gather your thoughts and is essential for several reasons: 1 You should never keep anyone waiting. 2 The palette must be prepared. 3 People or business should not interfere with your concentration.
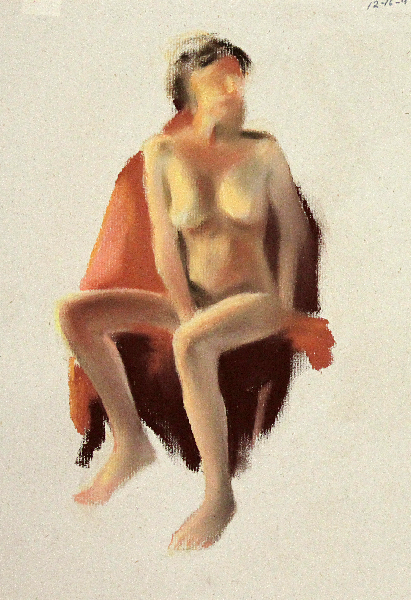
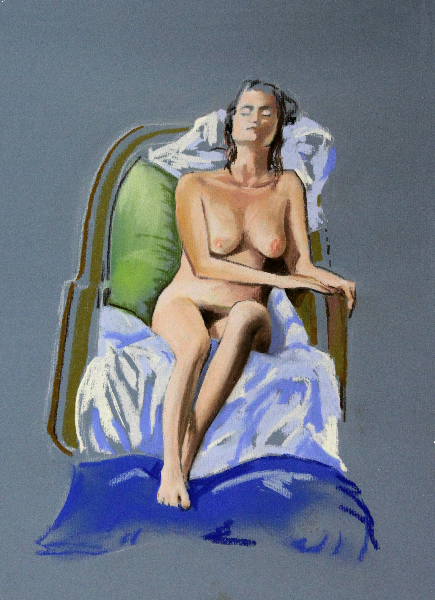
You must sit your model down, but at a higher level than yourself. Make sure that the women are comfortable, that they have something to lean against, and a stool beneath their feet. You should be as far away from your model as possible; this is the only way to catch the true proportion of the features and their correct alignment, as well as the sitter's bearing and particular mannerisms which it is essential to note; the same applies when trying to achieve an overall likeness. Do we not recognize people we know from behind, even when we cannot see their face? When painting a man's portrait, especially that of a young man, he should stand up for a moment before you begin so that you can sketch the general outline of the body. If you were to sketch him sitting down, the body would not appear as elegant and the head would appear too close to the shoulders. This is particularly necessary for men since we are more used to seeing them standing than seated. Do not paint the head too high on the canvas since it makes the model look too tall, though if you draw the head too low, the model will become too small; when drawing the body, take care to allow more space on the side to which the body is turned. You should also have a mirror positioned behind you so that you can see both the model and your painting at the same time, and it should be in a place where you can refer to it all the time; it is the best guide and will show up faults clearly. Before you begin, talk to your model. Try several different poses. Choose not only the most comfortable but also the most fitting for the person's age and character, so that the pose will only add to the likeness. Likewise for the head, which should either be facing forward or at a three-quarter turn; this adds to the resemblance, especially for the public; the mirror might also help you decide upon this point. You should try and complete the head, or at least the basic stages, in three or four sittings; allow an hour and a half for each sitting, two hours at the most, or the models will grow bored and impatient and their expression will change noticeably, a situation to be avoided at all costs; this is why you should allow models to rest and aim to keep their attention for as long as possible. My experience with women has led me to believe the following: you must flatter them, say they are beautiful, that they have fresh complexions etc. This puts them in a good humor and they will hold their position more willingly. The reverse will result in a visible difference. You must also tell them that they are marvelous at posing; they will then try harder to hold their pose. Tell them not to bring their friends to the sitting, for they all want to give advice and will spoil everything, although you may consult artists and people of taste. Do not be discouraged if some people cannot find any likeness in your portraits; there are a great many people who do not know how to look at a painting. While you are working on the head of a woman dressed in white, drape her in a neutral colored fabric like grey or light green, so that your gaze does not wander from the model's head; if however you wish to paint her in white, keep a little white fabric to drape around the head, for it too should receive some of the reflected light. The background to the sitter should in general be a subtle and uniform tone, neither too light nor too dark; if the background is sky than the rules are different and you should put something blue behind the head. Whether you are painting in pastels or oils, you should build up from the darkest colour, then paint the mid-tones and finally the highlights. Always thicken the highlights and always make them golden. Between the highlights and the mid-tones there is another tone not be overlooked, which has tints of violet, blue and green. Study van Dyck. The mid-tones should be broken up and less thick than the highlights, and the highlighting on the head should emphasis the bone and muscle, the latter being weaker than the former. Immediately after the first layer comes the flesh tone, chosen according to the complexion of the sitter; this will eventually blend with the mingling, shifting mid-tones. Shadow must be strong but transparent at the same time, that is to say not a thick but a ripe tone, accompanied by a strong reddish touch in the cavities, such as the eye socket, the nostrils and the darker, interior parts of the ear etc. The colour of the cheeks, if they are unpowdered, should have a peach tone in the hollows and a golden rose colour on the more fleshy parts, the two colours merging imperceptibly with the highlights to emphasis the facial bones which should be golden. There should always be highlights on the brow bone, the cheek bone near the nose, above the upper lip, in the corner of the lower lip and at the top of the chin and they should always blend in with the surrounding tones. You should take care that the highlights diminish gradually and that the most salient and consequently the brightest part is always the most luminous. On the head, the sparkling lights, both sharp and diffuse, are either in the pupil or in the white of the eye, depending upon the position of the head and the eye; these two highlights often give way to others less golden in the middle of the upper eyelid, in the middle of the lower eyelid, or at least along some part of it, according to the way light falls upon the head, than on the middle of the nose, on the bridge and the lower lip. The sharper the nose, the finer the light should be. Never use a heavy consistency of paint on the pupils: they will look more real if they have a transparent quality. You should paint in as much detail as possible, take care not to give the sitter an ambiguous gaze, and ensure that you make the pupils round. Some people have large pupils and others small, but they are always perfectly round. The upper half of the pupil is always intercepted by the upper eyelid, but if the person is angry you will often see the whole pupil. When the eye smiles, the lower half of the pupil is intercepted and covered by the lower eyelid. The white of the eye in shadow should be a pure and pristine tone, and the mid-tones, although they are not quite the natural colour (this is so with any object you paint), should never look grey or dirty. Sometimes the eye should reflect light from the nose and share some of its shadow. The eyelashes in the shaded part are clear and stand out bright and this is why you should use ultramarine when painting a light part that is in shadow. Observe the eye socket, which should be darker or lighter depending on its shape. It is made up of shadow and highlights, mid-tones and reflections from the nose. The eyebrow should be prepared in warm tones and one should be able to see the flesh beneath the gleam of the hairs which should be light and delicate. The setting of the eye is always painted in delicate bluish or violet tones, depending upon the whiteness and delicacy of the skin. Take care not to be too heavy with the latter or the eye will look as though it's full of tears. For this reason one should sometimes break into the blue tones with gold, but always cautiously. Observe the forehead well; it is vital for a true likeness and is a very important key to the personality. When the forehead has a square but prominent bone, such as in the self portraits of Raphael, Rubens or van Dyck, there is a definite concentration of light on these prominent areas. The first is at the top of the forehead, just beneath the hairline. It is then interrupted and reappears near the eyebrow. This in turn gives way to the colour of the temple where there will often be a blue vein visible, especially if the sitter's skin is very fine. In between these highlights is the natural flesh tone which fades into the center. The light returns, if more feebly, on the same bone on the other side. This mid-tone mingles softly with all the other mid-tones, eventually becoming the shadow that defines the shape of the brow bone. After this shadow, there is a slightly golden reflection, depending upon the colour of the hair. Above the eyebrow, the tone should become a little warmer: the accumulation of these hairs has the same effect as a mass of curls falling onto a well lit forehead. The shadow is warm. Look at the heads of Greuze and study the way in which your model's hair grows, this will add to the likeness and the painting will be more truthful. You should observe the part where the hair falls next to the skin so that you will be able to render it as realistically as possible; there should never be a hard line between the two; the hair and the skin should mingle slightly, in form and colour; this way the hair will not look like a wig, an inevitable error if one does not follow the method I have just described. The hair should be drawn in a body and should remain as such for the most part; it is probably better to use a glaze, otherwise the colours may bleed into the shadow and the main flesh tones of the face. The highlights on the hair are only visible on the prominent parts of the head; curls reflect light in the center and a few stray hairs break the uniformity. The edge of the hair should, like metal, have something of the background colour, for this helps to accentuate the turn of the head. It is also essential to study the ear and to place it in the correct position, understanding that it is a link between the head and the neck; you should make the shape as beautiful as you can; study the art of antiquity or beautiful examples in nature. For example, you might notice how in general the German, and especially the Austrian race, have ears that are situated a little too high according to perfect proportion. Likewise, the way the neck sits upon the shoulders is different from that of other peoples: it is wide, thick and rises high behind the ear. These people also have very strong temple bones. So if you happen to be painting a German, you should conserve this characteristic trait, along with the prominent forehead and the usually flat, sunken cheeks. As far as possible, try and paint the complete ear and study its cartilage formation well, even if you are going to paint hair over it. The colour that determines its shape should be warm and transparent, apart from the ear hole which should always be dark and opaque. Its flesh tones, even when highlighted, should in general be less luminous than the cheek, which is more prominent. The shadow thrown on the neck by the ear is very warm in daylight; the jaw should be drawn in subtle tints with delicate mid-tones in order to obtain the depth between jaw and neck. If the head belongs to a woman, the base of the jaw should have warmer tones than that of a man, whose beard absorbs the naturally warm flesh tones beneath. The shadow on the neck should also be very subtle and less ruddy than the face. It is essential to observe the proportion of the collarbones relative to the position of the head, as well as the way they reflect light; the chest area becomes a little deeper in colour towards the point where the collar bones meet; in general the articulations, such as the elbow, the kneecap, the heel and the knuckles are always darker than the rest of the body. If you have to paint breasts, put the model in a position where they are well lit; the best conditions for painting breasts occur when the light is direct and the colour should grow gradually stronger towards the nipple; the mid-tones which curve around the breast should be as light and fresh as possible; the shadow between the breasts should be warm and transparent. There are rules for the gradation of light, such as I have described for the head, for the rest of the body. If the figure is seated, the light focuses strongly upon the thighs and will gradually fade towards the heel." Elizabeth Vigee-LeBrun (1755-1842)
NEXT
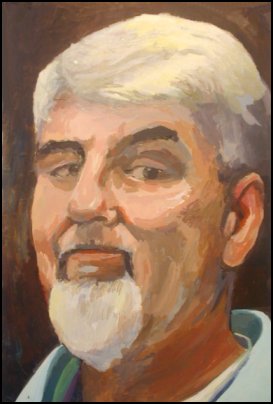
Self Portraits, 62 & 70 Years Old, acrylic, meonchalk.htm
|