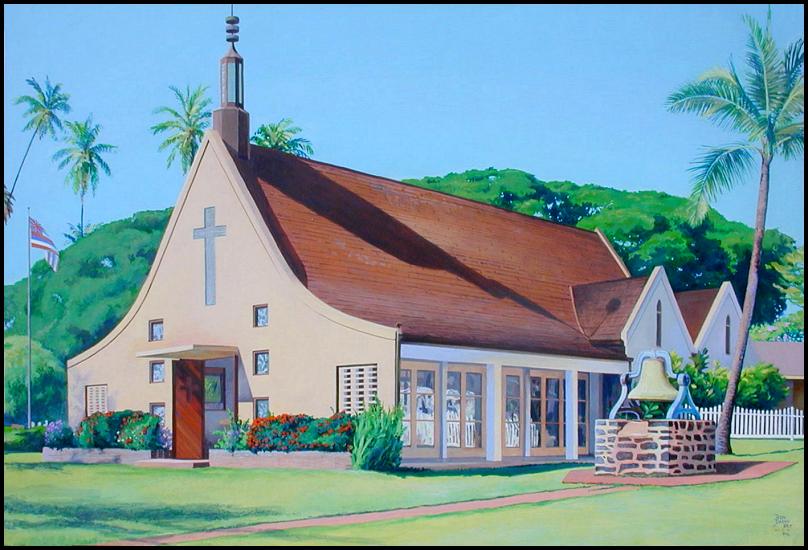
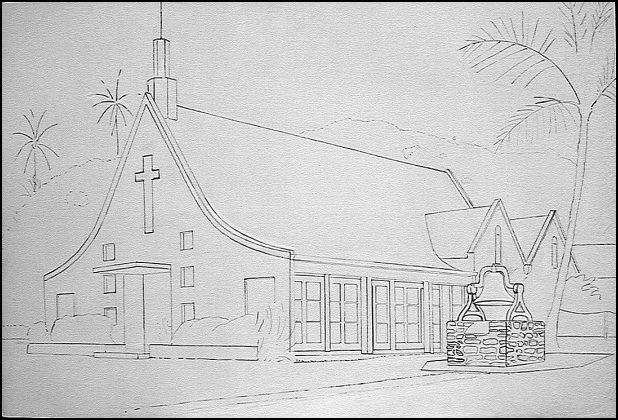
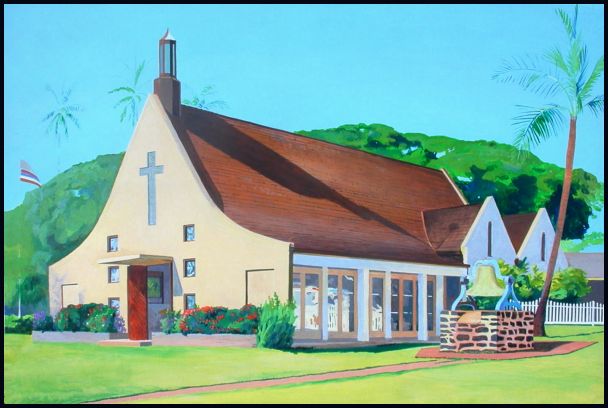
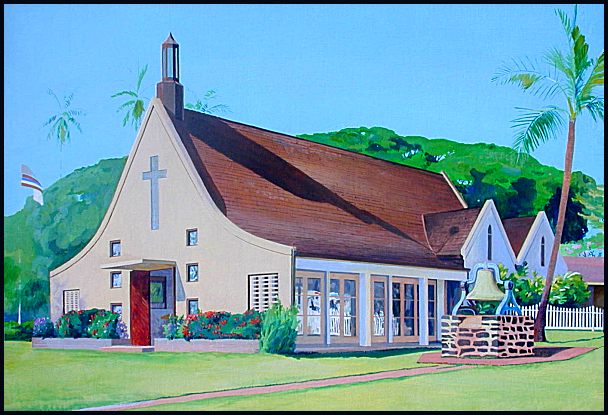
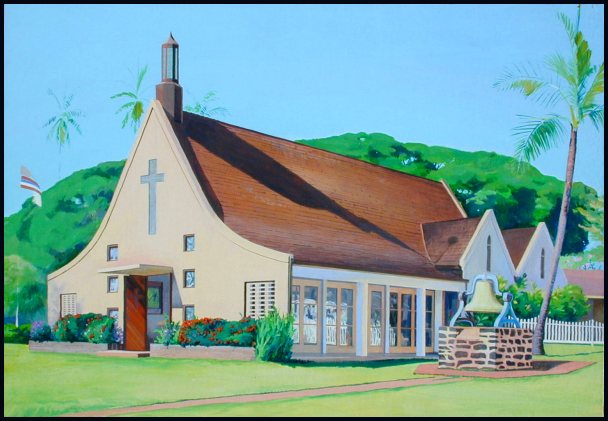
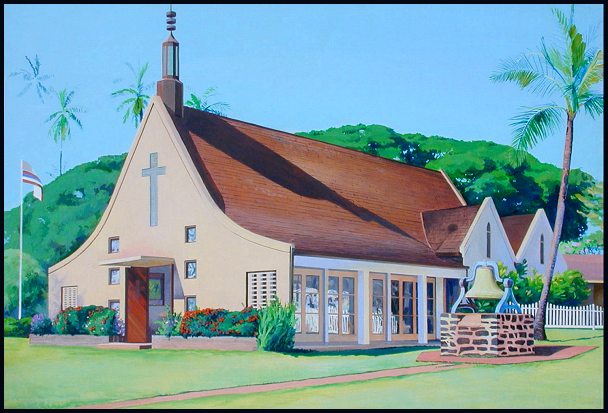
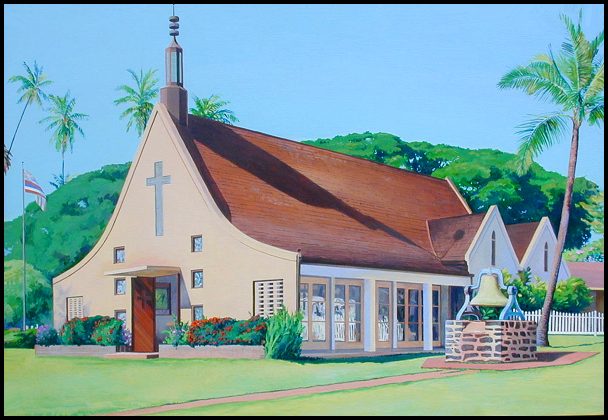
Waiola
Church
Lahaina, Maui, HI.
22" x 15" painted on ¼" birch panel support with a linen surface,
sealed with water based polyurethane.
Today is day one, 07-31-01.
|
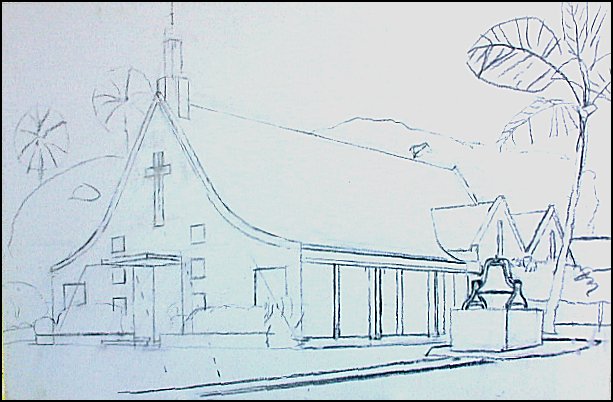
The charcoal drawing took 3 hours and forty-five minutes
All square buildings have two Vanishing Points that are 90% apart on the horizon line. Both of this paintings VP's happen to be marked and located at 'off the canvas support' locations.
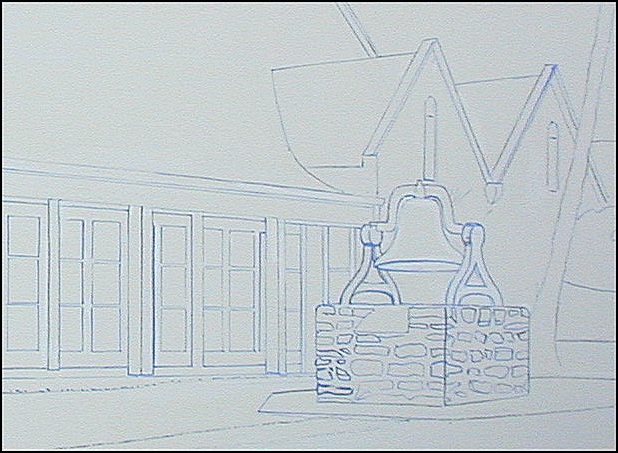
The "red X" in the annimation is in the box to find the optical center line of the box in perspective.
|

Another page about perspective was done in 2003 ulupalakuachurch.htm
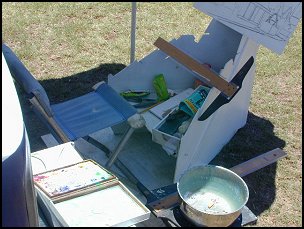
Here is my painting setup under a black umbrella, I view the image directly
over the support. which is setting on the sit-down easel.
How to make it, New window.
|
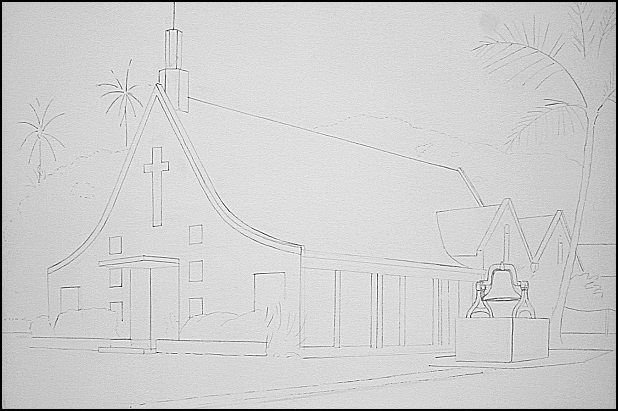
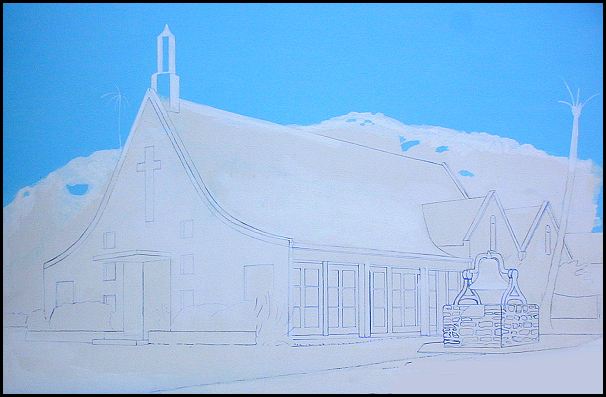
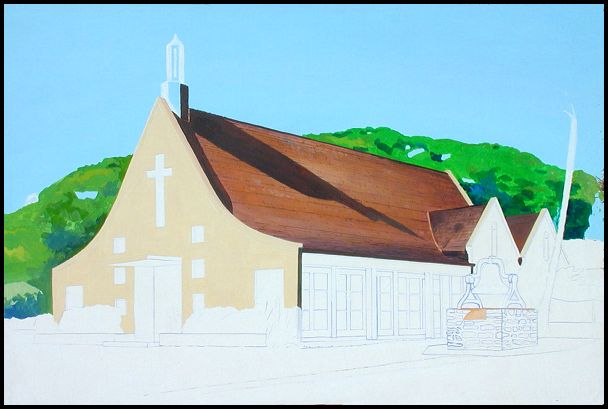
Here is the charcoal drawing gone over with acrylic paint. I used Liquitex Blue Violet for the lines and Liquitex Acrylic Slow-dry Medium, Extender Medium, No. 12-6711, 2 oz. Adding this water looking medium is like adding a high powered glue to the paint without adding voluum. I dust off the charcoal or pastel with a feather and paint the lines in with a #6 Isabey Series 6318. This brush is the bench mark for round ferrule pointed end, extra long sable brushes. If you only get one brush from this series get this one, next get the #8. When all was dry and set I washed the support clean, no paint lifted. Six and a half hours later I was finished painting over the chalk lines. |
|
After painting over the chalk lines the cleaned up mess looked pristine. More charcoal and some pencil laid the rest of the drawing in and it was painted over to look like this, after white touch up. |
Detail, Day 2 is over
|
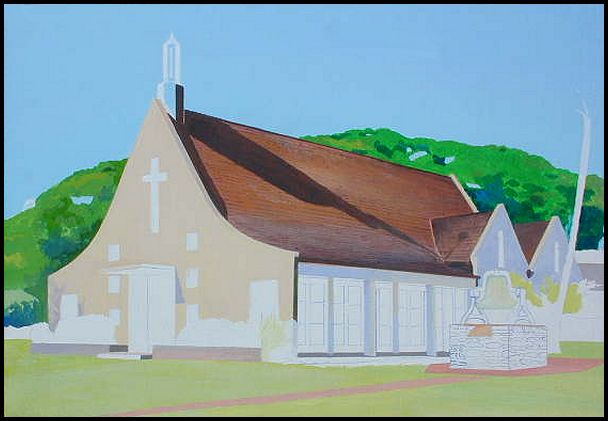
Wash the support, always at the start of the day. Acrylics are not as opaque as oils and thin washes will show and seal in dirt. Pre-paint in the big space areas that will have to be painted evenly, with white jar acrylic paint. I painted in the sky and the face of the building. with a soft #14 squirrel hair, flat ferrule, flat end, Yarka. It's a good thing I painted the sky white. It's hard to paint an even layer in the wind and I forgot about temperamental winds and had to wash of my first layer of cyan. It took a little 600# wet-dry sandpaper that never had to go below the white to get it clean. The second try was in the shade and out of the wind, it did great. There was no blend in this layer, just the cyan tint matching what was the brightest color in the sky. That first coat of color dried streaky, I have to white all my object edges and pick up any lines that may have been lost with this last coat. I mixed enough tint to cover every part of the sky plus a little extra for touch up. It went well, a little more ereasing white where I overlaped edges and it looked like this, ready for an under-tone glaze of transparent purple to make the ultramarine blue hue that cyan changes to at the zenith. Time, Three hours and ten minutes. Total so far, 13 hours and 25 minutes. |
|
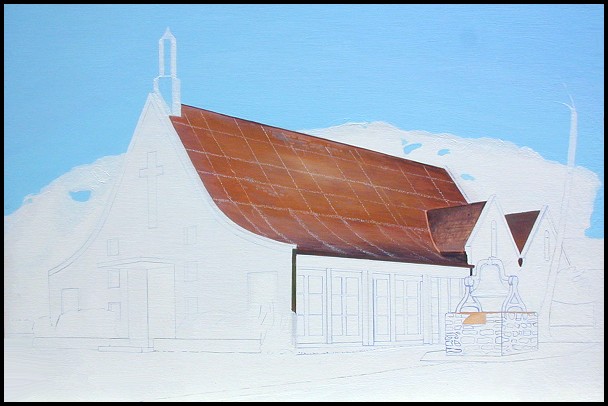
9:00, Washed down support and found small blemish and fixed it. I mixed up some Dioxine Purple and gloss medium and started applying it with a sponge brush. I had it made except for where I started, my first stroke. Blew it ... It didn't work good enough. I should have wet the whole area with medium and then started the glaze. Instead, I missed the blend by staining the dry edge. I had to do the sky over. So .. I laid the whole sky in opaquely with a Langnickel series 6080, 3/4" squirrel filbert wash. 11:00, Start the first color down on the roof and work till I'm satisfied with the base coat. It's painted without the steeple shadow, tomorrow when I add it the time line it will be set for the whole picture. With white chalk I made some directional and perspective guide lines for the shake tiles. 11:30, Done for the day. 4.5 hours today, total so far, 18 hours and having fun. |
|
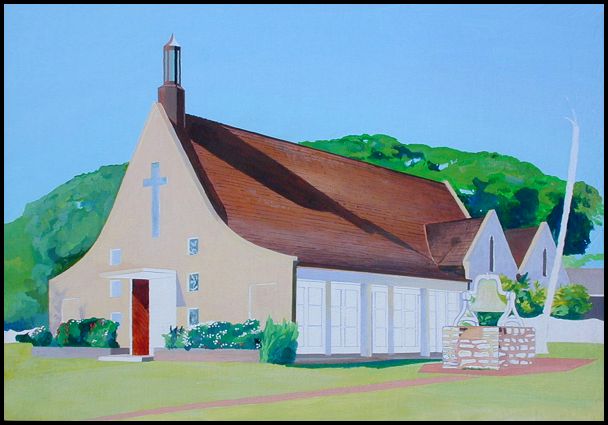
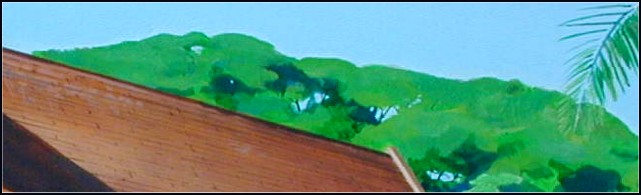
8:58, Start on rooflines and shadows. 9:57, Finish roof shadows with brush #5, and roof tiles with brush #2. 9:00 is the shadow time. Tomorrow I will add the shadows to the front of the building, the porch roof and windows. 10:54, Finished the sunlit areas of the front facing areas. Two different styles of brushes were used. #1 for the smaller strokes like the one on the steeple and two at the back of the roof and the gables. #4 for the large fill in area with all the angles. 11:08, Start background trees. Brush #5. 11:51, Stop working on trees, my 9:00 picture time is well over for the day.
Knowing and using brushes correctly is very important. A sign painter will use the most verity of brushes for different needed strokes. Perfection turns me on, I plan ahead for different series of brushes. Round ferrule, 3/32 diameter, flat ended sable, Langnickel Series 671, 1/16 diameter round, 5/8" long sable, pointed end. Flat ferrule 1/4 inch wide 3/4 inch long, flat end, series 167 sable. Used up flattened watercolor sable. Here is a new window to the pictures of the
brushes used today.
3 hours today, total 21. |
|
8:18, Arrive and set up.
HOW TO TIP: Yellow, orange and red all darken to brown, yellow goes through Indian Yellow Golden and Indian Yellow Brown. Orange passes through Burnt Sienna, Red passes through Red Oxide. 11:27, adding roof tile shadow lines.
Three hours and twenty minutes on location today.
|
|
9:43, finished adding new colors, now I'm evening out mass areas for later work. I'm wondering about the shadows on the face of the building. They are there only for a short time and they take away from the power. 11:29, finishedfor the day. Total 27 hours. |
|
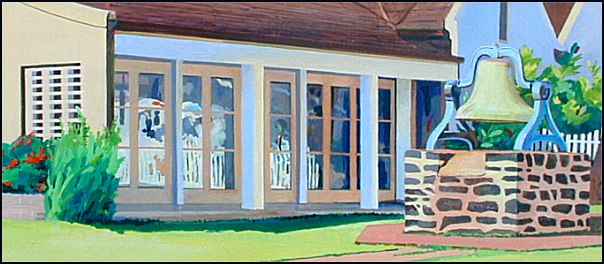
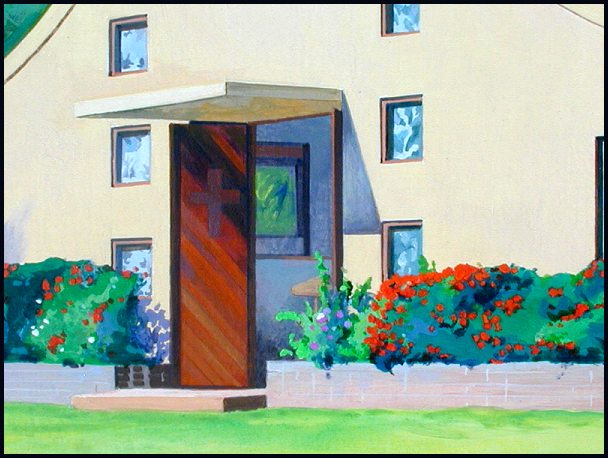
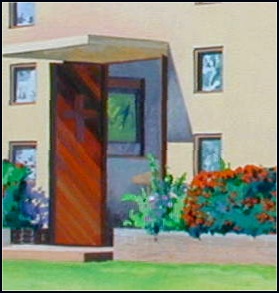
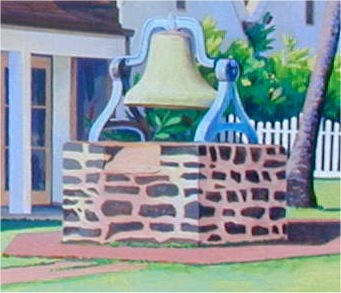
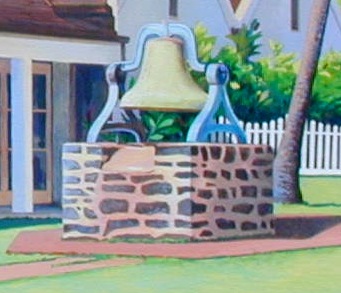
8:27, Arrive on location, wash the painting, start on the side doors. It's nice to have a 12" and a 24" clear plastic straight edge to lean against for support to draw and stroke a straight line. Next, the glass on the front of the building. The cross and six windows. I decide to have the door open, the color is stronger. Add the cement color between the rocks on the bell stand and the local color of the building behind.. 11:47, end the day, 3 hours. Total 30 hours. |

|
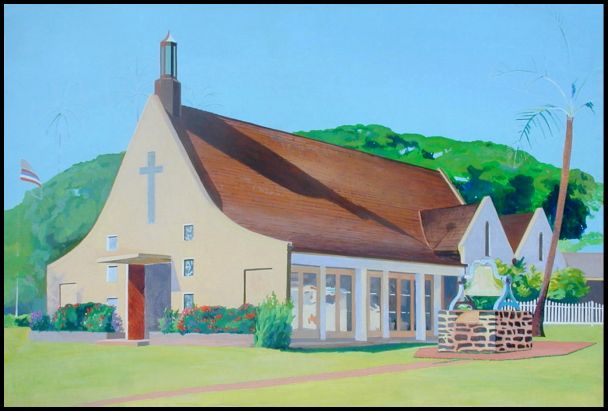
8:20, Arrive and wash the painting. I'm painting inside the van now because it's more conformable. I should have started in here. The change is not so different, the drawing is done anyway. Today I've added the fence, front window shadows, palms, flowers, bell stand, door inside local color and the flag. Also a little more on the side doors and glass. 12:53, finished for the day, 4½ hours. I still haven't got 100% coverage yet. Tomorrow is Sunday, my tennis day. Total time so far, 36 ½ hours. |
|
8:11, Arrive and wash down the painting. setup is faster now as I'm not putting away my brushes at the day's end. First I finished the shadow from the eve of the front door. Glazed the grass colors over the solid. finished the front windows and the glass cross. Put the palm fronds where they are going to be. 12:06 finished for the day. Four hours. Total 40 hours on location. |
|
8:50 Arrive. Hooray! 100%coverage. I'm half way home.
1:15 finished for the day. Look at the right front brick work, it's ready for a layer of color. Total 44 hours. |
|
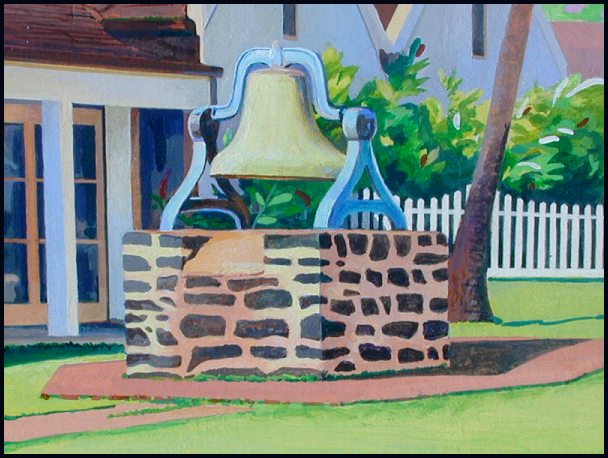
8:52, painting on the bell only.
This dilemma is sweet. Which pattern takes the space used by the line in the drawing? Answer. By enlarging the object behind to include the line you follow the How-To Tip "The line belongs to the object behind." 9:40, Cleaning my brush strokes so they look like what they should. Acrylics dry darker then applied if they have any white in them. Sometimes they can be touched up, sometimes I have to lay in a new stroke. This task can be done off location like I do at night with my halogen and florescent lights. The point is no new objects or colors are added. 1:53, caught up with the clean up. Tomorrow first thing I'm going to be ready for the colors in the inner shadows of the brick front area.
Total 49 hours on location. |
|
8:00 Arrive. change the color of the two gables on the right rear. 9:47, finished with the bell's hanging support. 10:57, finished making white changes in the side porch. The suns light has changed too much to add any more color today. Drawing and painting the front left brick window. HOW TO TIP: Pick the color you want to match, find the color and the opposite color and mix a dark neutral. Now move in the direction of the chosen color till you have it, add as much white to tint as necessary. !2:00, finished left brick window. 1 hour 3 minutes. Total 50 hours. |
|
8:32, another beautiful day. I've chosen to work on the front door because it's open. That means another wedding. The side doors are open too so I can't work on that area. Start by smoothing down patterns getting them ready for glazing changes. HOW TO TIP : To blend a stoke, paint half of it and before it dries stroke the same line with water only almost up to the far edge of the previous stroke. It may take a little interior work to move the pigment arround evenly. After the white dot was put in representing a flower, I had to go over each one another 2 or 3 times. It was a little tedious getting an even coverage because a certain thinness is required to have a flowing consistency. Getting all the way to each dots edges was fulfilling. The cross on the door was demanding, almost not visible. 12:32, added colors that were low on my palette. Yellow Oxide, Cobalt Blue and Burnt Umber. My pigment are stored under a closed lid. The colors are mixed on the outer lid. I haven't had to remake the palette for a month. Thanks to the wet cloth liner in the lid. 12:32, finished for the day. Working only on the door and flower areas. Total 54 hours. |
|
8:17 arrive and wash the painting. The first thing I'm working on today is the coconut tree trunk on the right. The base is too close in contrast to the bell stand. Either the bell stand has to be darker or the trunk has to be lighter.
Also the background tree shadow area behind the middle of the tree trunk has to be darker so the trunk will stand out. I would guess that color would be a mix of transparent magenta and transparent green plus ( and here's the veriable ) adding blue and white. I mean Ultramarine Blue of course, not Cobalt Blue. Cobalt blue has more cyan than magenta, Ultramarine Blue is half and half. Just saying blue should be enough. The light and my pigment color wheel are the same and light's color wheel blue is a well defined by wavelengths. Next, the color reflection off the porch roof which we can't be seen but is painted with red oxide.
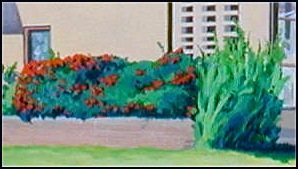
The flowers and shadows that were solid Cadmium Red Light now have some modeling and shadows. The green flat area next to the red flowers is ready for the next step. |
The next day's change in the green flat area wasn't much.
|
9:34, Still on the 15th day. The background foliage needed simplifying before I could start modeling the forms. In oil paint you paint more opaquely and mix more on the painting so it's not as important to have an even under painting. I lightened up the sky where it meets the trees. "It's always lightest next to the dark and darkest next to the light." Tomorrow I'll do the tree modeling as the top priority. |
On the side porch I added the door's molding shadows
and worked on the reflections of the picked fence in the glass doors.
|
HOW TO TIP, We all know acrylics darken when dry, especially if the color is a tint. So here is what you do when making a new blend. Wet down the area you are going blend, this will lighten the dry area so the new wet paint will match the old paint closer and be easier to blend out. 11:33, finished for day 15.
|
|
I am one month into this painting and the end is in sight! Would you like to see a painting that took a year?
8:02, arrived, another beautiful day in Lahaina.
10:50, The trees are done for the day. Next the top of the steeple and the flag pole. 11:46, Finished for the day, tomorrow I'll play tennis.
|
|
8:10,arrive and wash the support.
9:45, I'm looking at the front etched glass window and deciding what color I see. It's a blue green gray. How to mix it? Blue and a little of it's complement brown and a little green should do it, after I tint it up a little high because I know it will dry darker. The next tint up of this tint will give me the sandblasted lightest portion. The opposite of orange and burnt sienna is cobalt blue. 10:16, Working on the picture sideways now, looking for what I call "eye fractures". They are usually areas where two colors butt togather and I missed by a little. Or areas that have to be blended smooth. By the time I am done every inch of the picture will have been gone over at least twice. HOW TO TIP: I just noticed the shadow on the roof would not return in the same place untill till next year on the same day. Today at the same time the shadow is on the picket fence. HOW TO TIP: From Permanent Green Light to Yellow Green the opposit color is Purple. Purple will darken these colors naturely. In the close foreground the opposite color of Thalo Green would be Magenta. I love these details, I added more flowers, more grew! 12:00, finished for the day.
|

|
8:08 arrive Day 18. Wash the picture of course. 9:21, I dropped the palette :( some of my colors were thrown togather. That will end this palette and for the next picture I will have to start over. That's the way I usually do it anyway if the paintings are not back to back time wise. The inside of the box is where the pigments are placed, white and the mixed colors are on the top. So I can keep a palette a long time by just spraying the cloth in the lid. HOW TO TIP: As I approached the end of the upper palms I grabbed a larger brush to lay in some solid colors. This was a 1/4 inch flat ferrule flat end hair sable. Keep it simple even if it takes longer. There isn't enough wind to raise the flag again. I wish I had painted it limp. 10:33, finished for the day. The painting days are getting shorter and the colors more exact. I didn't shoot a picture today because the changes are so small.
8.:15 Day 19. Adding to the top of the steeple and the length of the steeple's shadow. Also warmed up the shadow with a glaze of Burnt Sienna. Total = 64.55 hours. |
|
8:00, arrive. Adjusting colors by glazing with complements.
10:11, finished for the day. One more should do it. Total = 66 hours. |
|
Day 20, arrive and wash the painting. It's amazing how much dirt washes off each day.
Day 21, arrive 7:50. Today should be the last day, take out the big brushes. Change palms main colors cooler. This is not a wash, these changes are done with full blown opaques. What you see is what you get. Add shadows in the foreground grass. Change the color of the roof on the second building and the last gable of the church. 9:00, finished adding color, it's clean up, smooth out and blending time.
10:58 Finished "Lahaina Wailoa Wainee Street Church" Number 857.
Total = 69 hours. |